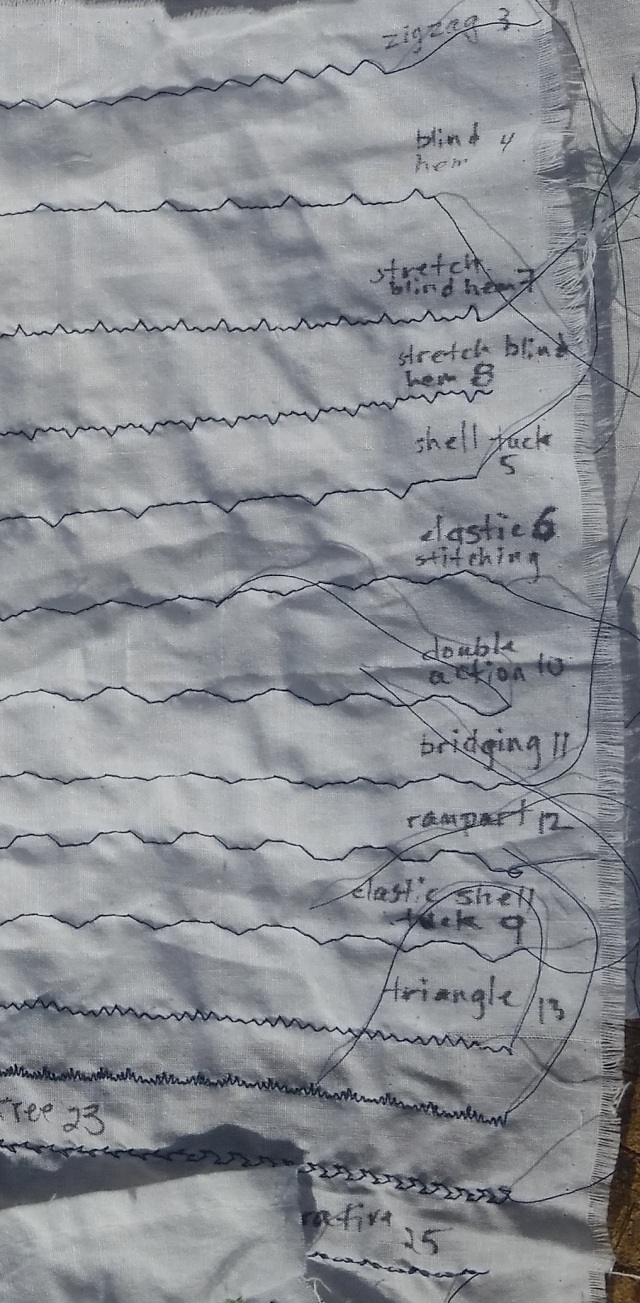
I’m hoping to learn machine free-stitching techniques soon so I recently tried out all of my sewing machines stitches and “documented” my results.
I stitched all the numbers on the wheel then I started experimenting with the stitch length
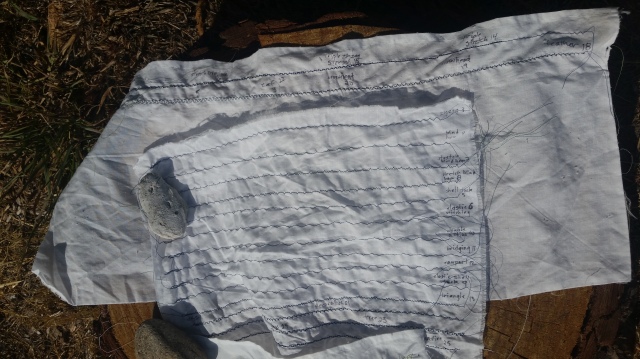
the final sampler
My First Machine Free Stitch
I freehand sketched the main leaf pattern then used all my available thread to fill it in with special stitches (ran out of bobbins after the 3rd leaf…experiment ended for now…so lazy).
A Finished Product: Sewing Machine Finally Earns Its Keep
I needed to replace (or re-cover) the arm rests on the rocking chair in the living room (It’s the rocking chair from my now 20 year-old daughter’s baby years…needed a little refurbishing and we’re not getting rid of it…ever… o^O).
Luckily I bought this cool roll of paper from the place where I took my machine sewing classes (which is kind of shiny on one side…deli paper?) to cut out patterns.
I measured the arm rests of the “Rocking Chair Needing New Arm Rests” and cut out at least four paper patterns before I got something that might resemble a finished product (with seams)…(cheap paper patterns are so helpful to avoid mistakes with material!)
And here we go! I just need to secure it with a few anchor stitches to the arm rests!
I inherited this material from a friend (it matches so great!!) and just sewed some seams onto each edge to get them ready for the upgrade. I dealt with the corner seams like an (untrained) champ and I now have a new home decor solution!
When I dreamed of owning a sewing machine I imagined myself sewing curtains for my home…so this seems pretty close to the dream (plus I’ve realized since then that buying curtains is way easier…unless the windows are a weird size…spoken from experience). #yaycustomwindows #rennovationsarefun
I have WIPs, I have Done Stuff and I’m signed up for more – yippee!
Signed up for More…
Through a friend I made at the Art and Soul Retreat (who doesn’t live locally) I found an artist and teacher who DOES live locally – right here in San Diego!! I’m beyond excited and even though she offers online classes that look awesome, I’ve signed up for three in-person classes to learn some new skills.
Artist and Teacher Jane LaFazio
Jane LaFazio teaches lots of cool skills I can’t wait to learn!! (her website, her blog, her teaching schedule – including online classes you can take from anywhere!!)
I’m signed up for these in-person classes over the next month:
Stamp Design & Carving
City Block Art Quilt
Abstract Collage with Gelli Plates for Mono Printing
These are some art techniques I’ve been wanting to learn more about so I’m delighted and thrilled to have the opportunity to take some all-day classes with an artist. Of course I’ll share pics of my learnings!!
Done Stuff
At my last machine sewing class I made a small zipper bag. I love first attempts because of their history…and yet, so much to learn about elegant machine zipper stitching…it’s kinda wrinkly…
My first zipper bag (complete with trick cover-up quilting on this side…which is now my favorite side because that feather stitch is cool!)
I’m not sure how I feel about stitching zippers. I need to stitch more to have a valid opinion. I’m slightly afraid of stitching more…and so I must. (P.S. My attempts in class to stitch a button hole sent my sewing machine to the hospital, but good news! It’s fixed and ready to sew another seam…and zipper…and, uhm, gulp, buttonhole? I better check youtube first…)
I want to add that I took my tote bag to the local pet store on tonight’s dog walk (along with my zipper bag, which carried my credit card, DL and phone) and everything fit in my tote bag for the walk home: big bag of dog food, other sausage things we add to his food and my zipper bag). I want to make a million more…tote bags. 🙂
This pattern is inspired by a blogger who I happened to find as inspiration in early 2015, and I’m happy to commemorate her contributions in this CAL. The colors are blueish-green and yummy and I can’t wait to get started.
Found on a Dog Walk
We found this tiny creation on the sidewalk y’all (thumb included for size reference).
At first glance it might look like it’s made from a paperclip (that’s what I thought), but it has a silver tag that suggests soldering, so now I’m intrigued…and inspired to write a haiku (lucky you!)…
It was on the ground Silver treble and bass clef Left for me and you?
WIPs (Works In Progress)
OK – enough poetry posturing. It was fun while it lasted and I’m going to save that little silver creation for one of my future art works. (I think it might get sewn onto my “City Block Art Quilt”!)
In the meantime, I’m off to work on my newest needle lace pattern…
I tried variegated thread and a larger pattern on the brown leaf with mixed results. Now working the surf pattern with metallic and silk threads…digging it so far… pics to come…(sorry for poor lighting)
Let me know if you have any cool zipper bag patterns I can try and/or if you sign up for the CAL.
This year’s recital included the Pink Panther theme song (acrobatics) and “Yankee Doodle Dandy” (tap). Don’t miss the orange shag carpet and my feather headdress!
One of the things I learned early on is the value of learning how to fix mistakes (in dance this involves keeping your face in the right configuration – usually a huge smile unless it’s modern dance – and moving around dramatically until you catch up. It works every single time…even in real life sometimes…).
Fixing Sewing Mistakes
Today I prepared for my last sewing machine lesson (which is tomorrow), and to get the most out of my time (still have to finish up those pj’s) I prepared some things ahead of time for another project: a small zip-up bag made from the remnants of the tote bags. I want to learn about my machine’s zipper foot and button-sewing attachment before the day is over (I’m just going to sew two random pieces of material to button together – not digging the pillow cover with buttons she’s offering – it’s cute, we just have too many pillows already).
The teacher suggested that I just cut out my pieces and bring them to class, but I decided to work ahead on the instructions as much as I could. So this brought me to quilting two pieces of material together with batting in between. Only I forgot to add the 2nd piece of material to the back of the first one (basically “quilted” the batting to one layer of material…not exactly “quilting”), and I got a line of stitch in on the second piece before I remembered. Ah well, forging ahead…
When I was done I had one piece quilted properly (the lining material with the batting makes it looks a little puffy), and one piece that was stitched “like” it was quilted – but it was completely flat (missing the attached lining piece). I thought about just using it as is and letting the seam stitches hold things together, but one of the linings would have been wriggling around inside the bag if I did that so I got creative. I tried a decorative stitch on my new machine!!!
top piece is quilted to original design; bottom piece has been amended with feather stitch on top of the original vertical lines to fuse the lining piece to the batting
I am MOST IMPRESSED with myself for getting all those feather stitches directly on top of that already stitched line (of course I HAD to use a lighter color thread for “creative purposes” – which shows everything). Looks like I did it on purpose now (though I probably won’t make this decision again as a design choice – pain in the butt to line those stitch lines up).
Once again I have learned a new and important skill: how to undo or fix sewing machine mistakes (P.S. the seam ripper was involved on this one because I also sewed 3/4 of a row of feather stitch with no thread in the lower bobbin – doh!).
Can we also take a moment of silence to enjoy my nearly perfect 45 degree angles on those lines (heck, maybe they’re perfect! They look perfect to me!!). I used another new sewing tool to do that (it’s just a huge flat ruler with a bunch of angles and stuff printed on it) but there was almost math involved, as well as a dull piece of sewer’s chalk from my 7th grade home ec class, and I had to sit down and think about it for a second.
Flower Time!
Meanwhile on today’s dog walk, one of my favorite flowers:
Amaryllis – These usually show up a bit earlier in the year here…shifting weather patterns
I’m back to my regularly scheduled programming this week, returning to my day job, or what I like to refer to as “my new daily grind” (it’s definitely caffeinated). The night time blend still involves art du jour as possible, and tonight I have more stuff to share from my Art and Soul Retreat.
Turns out there are soooo many ways to felt beautiful things!! I talked earlier about my first wet-felted scarf and needle-felted penguin (see: felting). I decided to felt some more penguins and I took a few pictures along the way.
Hand Needle Felting
Penguin #2 started like this…just a black coil of wool roving and that little purple-handled needle (of doom, if you’re not paying attention).
Magically (after so very much hand-punching) that black coil of wool roving turns into a penguin base – ready for his mask and tummy cover (you can see First Penguin modeling spookily in the distance – he doesn’t move around much – good model).
TA-DA! “Felted Penguins in Ice Plant”
They’re cute little buggers and I want to make more!
Machine Needle Felting
So this is where the learning got real. We used Bernina machines with felting foot attachments, and the activity looked something like this.
Now. The person in that video is a ninja expert and is sewing at the speed of light…in circles. These happen to be the two behaviors that lead me to break approximately five needles (I lost count, and there was a hand-held felting punch in the mix as well. Oh so much learning. I was warned…) So that video isn’t so much “me doing machine needle felting” as “don’t try this at home.”
But I tried it at the retreat, because the teachers encouraged it, and they were the pictures of patience as they changed my needles (and removed the needle pieces from my work…with pliers…they didn’t even snicker!). Here’s the lessons I learned about machine needle felting:
Start out with some big pieces on your base felt, to get the feel of the felting needles (small pieces can be hard to felt into your design at first – edges are hard to deal with)
Start out at a very slow speed
Don’t use materials that are too thick (needles break – start thin)
Edges are tricky – don’t let the felting needles push the material down into the stitching hole (I finally figured out a few ways to deal with this; trial and error can be “fun!”)
My First Experimental Pieces
One of the great things about this Art and Soul Retreat was the ability to experiment with lots of different media. In this machine needle felting class they had all these sewing machines set up with the needle felting attachments, and once the teacher shared the basic technique we were free to use the machines and her stash (as well as some sharing students’ stashes!) to experiment.
Many of the teacher’s designs involved covering the top of the base design completely with a white silk scarf and needle-felting it so that you could barely see the base material underneath. But I preferred to try that on only part of my design (I’m still working on the concept of “collage” and possibly covering up an original layer :). You’ll see the white silk scarf running vertically in the top right corner of the design – pulled apart with my fingers as I felted so that more of the fabrics behind could show through.
There’s some orange-dyed cheesecloth in here as well – that’s really fun to felt with! And more silk pieces running horizontally as I tried tacking other pieces in (the pink across the top is one of my favorites).
I’m working on layers here. The base felt was white, covered by pieces of cotton and velvet (bottom left corner in purple – my fave piece! I love how dimpled the velvet got with the felting), then felted on top with strips of silk, then embellished with beads.
After Lunch…
I tried something completely different.
I started out with a blue piece of felt. (This is the end result turned upside down – you’ll see why in a second. Just remember…blue piece of felt…)
This is after felting – you can see where the yellow and white fabrics began to fuse with the felt and come through to the other side. This was actually a pleasant surprise I discovered after working for about 3 hours on the other side…
So many layers…base cotton material, strips of yellow and white (silk and cotton), layer of chiffon scarf over the whole thing, then ribbons of white silk felted on top. I spent extra felting time on the yellow strips and maroon circles, to bring them to the front.
I really was just messing around with the felting machine at this point – trying to attach different layers while maintaining a “sun-ray” design in the felting. I only felt-stitched along the sun ray lines (instead of up and down, side to side or the dreaded round-and-round) – which created that really fun back view in the end.
I like the frothy edges of these pieces, though I could just as easily cut these pieces up, zigzag stitch the edges and use them for smaller pieces.
After doing needle-felting by hand, I can definitely say that a sewing machine attachment is interesting to me. I can’t really create 3-dimensional shapes so easily with the machine (e.g. cute penguins), but I can create some very interesting background material in short order using scraps and hand-dyed fabrics.
I am considering that sewing machine attachment…
Have y’all done any felting you’d like to share? I’m new to this and very interested in what others are doing in this space.
I’m not sure exactly why I’ve been so afraid of using a sewing machine up until now…but I was. So I tackled that baby head-on and made two more tote bags (based on this one I made in class).
I learned a lot, made some mistakes (always a part of learning), and I now feel like I’ve conquered my sewing machine (enough to work it anyways). Today I filled a bobbin and threaded my machine with new thread (a first for me, unsupervised), and completed two more tote bags.
Another greenish theme allowed me to use the same thread in the machine as the last bag (lazy and/or addicted to this color palette)
This one is my favorite – the colors and prints make me inexplicably happy.
The lining inside on these is the same as the top print, which may seem like a waste of print material to some, but I enjoy the happy surprise of a party inside the bag and the darker print on the bottom will show less dirt.
Things to work on:
My measuring and cutting needs help – things didn’t line up as well as they did in class and I’m a bit baffled by it.
The straps don’t match up exactly on the bottom of my two new bags. I’ll ask the teacher how that might have happened (besides my earlier mentioned measuring/cutting challenges).
I forgot to stitch the top of each new bag and had to re-string the machine with the green thread. Pay attention to detail, and good on me for practicing threading the machine again. (What does everyone do with all those half-filled bobbins? Do you just keep buying more for new projects? Do you unwind them when you’re done? Seems like a lot of bobbins…)
In this Saturday’s class I’m going to start on some flannel pajama pants (there’s elastic involved…I’m a little nervous). Wish me luck!
I am taking a sewing machine class that spans four Saturdays. My experience with sewing machines has been: hands-on in 7th grade (the dress I made didn’t fit well over my shoulders…), The End. So I’ve been hand-sewing and hand-mending for the last XX years, living in fear of sewing machines, broken needles and threading mysteries.
The first class we just talked about sewing materials and techniques, but today I hauled my new sewing machine into class and made a tote bag!!
the dark green panels are all pockets!the bottom – I made square corners y’all!
I’m thrilled with these close stitches right on the edge (it’s the small wins on the big projects that matter). Sewing machines are cool!
OK – So I’m going to sew up 12 more of these post-haste (not really…but I feel inspired!). Just as I suspected: sewing machines sew things up way faster than by hand (soo-prize!).