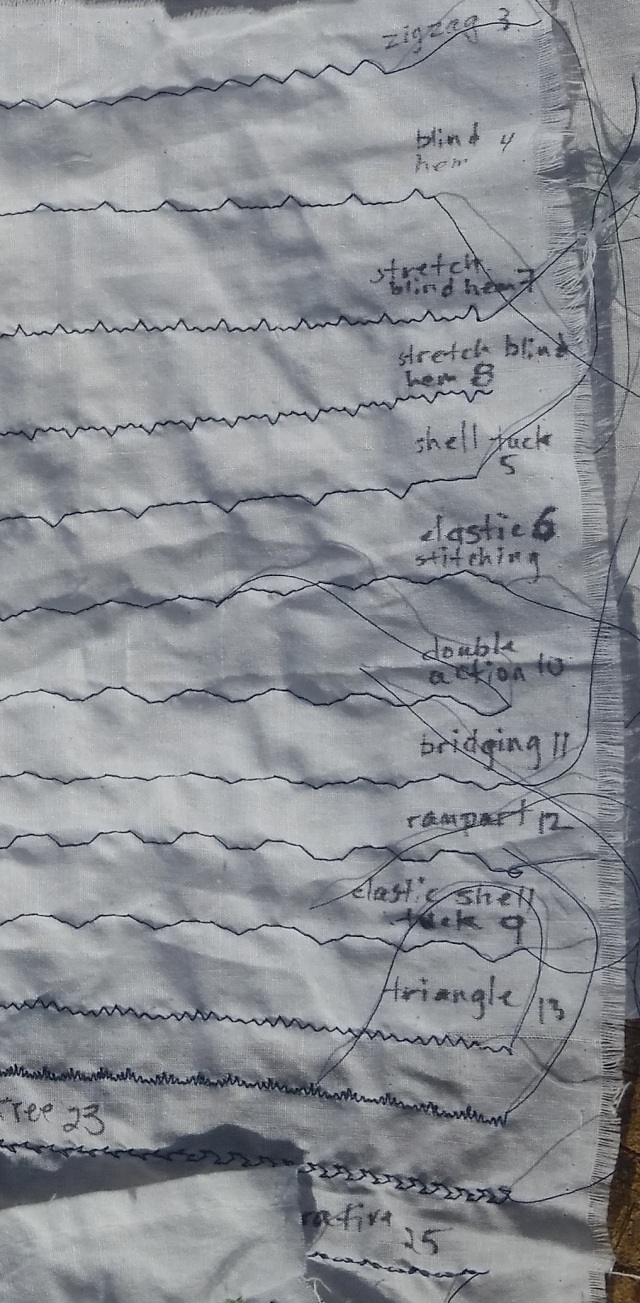
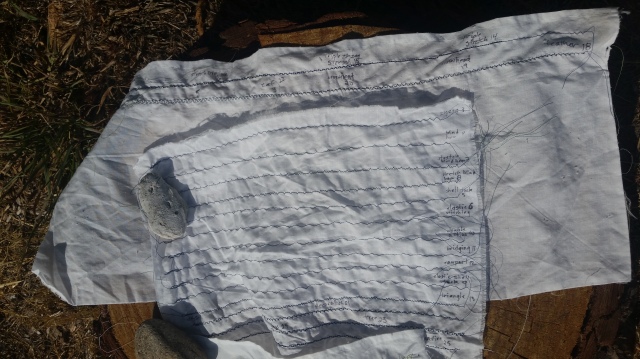
I’m hoping to learn machine free-stitching techniques soon so I recently tried out all of my sewing machines stitches and “documented” my results.
I stitched all the numbers on the wheel then I started experimenting with the stitch length
the final sampler
My First Machine Free Stitch
I freehand sketched the main leaf pattern then used all my available thread to fill it in with special stitches (ran out of bobbins after the 3rd leaf…experiment ended for now…so lazy).
A Finished Product: Sewing Machine Finally Earns Its Keep
I needed to replace (or re-cover) the arm rests on the rocking chair in the living room (It’s the rocking chair from my now 20 year-old daughter’s baby years…needed a little refurbishing and we’re not getting rid of it…ever… o^O).
Luckily I bought this cool roll of paper from the place where I took my machine sewing classes (which is kind of shiny on one side…deli paper?) to cut out patterns.
I measured the arm rests of the “Rocking Chair Needing New Arm Rests” and cut out at least four paper patterns before I got something that might resemble a finished product (with seams)…(cheap paper patterns are so helpful to avoid mistakes with material!)
And here we go! I just need to secure it with a few anchor stitches to the arm rests!
I inherited this material from a friend (it matches so great!!) and just sewed some seams onto each edge to get them ready for the upgrade. I dealt with the corner seams like an (untrained) champ and I now have a new home decor solution!
When I dreamed of owning a sewing machine I imagined myself sewing curtains for my home…so this seems pretty close to the dream (plus I’ve realized since then that buying curtains is way easier…unless the windows are a weird size…spoken from experience). #yaycustomwindows #rennovationsarefun
I’ve seen the word “zentangle” come up in “adult coloring” searches and have been thinking about it for awhile. This weekend I decided to do an image search on “zentangle designs” and I dove right into the vat of kool-aid. Now I’m a zentangle addict with some fine-tip Stabilo colored pens on order (due to arrive any day now, but who’s counting. I am. That’s who’s counting.)
It All Started with Chisel Tip Sharpies and a Kleenex Box
I *think* I bought this set of Sharpies for a banner that never got made (how else does one find oneself in ownership of a full rainbow set of large chisel tip Sharpies?).
Then there was the Kleenex box in my office that has white flower designs. I had a few Sharpies in my office pen holder and lots of time on my hands listening in on business meetings…so doodling began. Along the way I realized that these big Sharpie markers had a calligraphic edge so they got carted out to my office for further doodling (pictures forthcoming, once the masterpieces are complete…of course. Reminder: There are 6 sides to a Kleenex-box-work-of-art. Have patience people. Reminder to Self: This Kleenex box “work of art” is destined for the Recycle Bin. Art Everywhere!)
What Would These Sharpies Look Like in My Art Journal?
My mom is my first official Art Supporter and she enrolled me once in a brief calligraphy class that involved “nibs” and “ink” and some really cool lettering (I was probably 12 yrs old). As soon as I started messing with these chisel tip markers it all started coming back…
First I tried practicing the calligraphic strokes I remembered, plus some general mark-making.
As you can see on the next page I started one of those “zentangle” designs we used to make in kindergarten (Instructions: scribble a big set of connecting loops then color the inside. The beginning of many refrigerator-art-masterpieces…not to mention adding wax paper, crayon shavings and an iron. We were all artists in kindergarten and we still are!!)
Here’s another angle of the tangle (ok that was fun):
Crayons graduated to Sharpies…and more ideas are generated. I barely got done with the Sharpies before I was off and running in my sketch book with some fine-tip markers.
Taking It to the Image Search
Once I realized the similarity between our childhood scribble homework from kindergarten and the “official art form known as zentangle” I was off and running.
My favorite image search engine provided helpful filters (in lovely rainbow colors) to show me what everyone is up to in the zentangle world (it’s a whole world y’all). I saw “hand” and “step by step” and started making some marks.
Hand Patterns in Zentangle
When I saw what the world is doing with handprints and zentangle I had to get me some of that. So I made the old turkey beginning handprint with a pencil and started doodling.
Here’ the first one I did of my hand using a couple of super fine black sharpies.
Here’s my mom’s hand with some different designs. I love the 3D designs and keep trying to emulate them.
The railroad tracks were the first design on this hand print (hard act to follow, but easy to learn from the free online tutorial graphic). The “tendon design” on the thumb turned out pretty cool. The middle finger is a 3D pattern gone wrong (and saved at the last minute :).
And then I got hold of my daughter’s Stabilo point 88 color markers…Oh Happy Day!
Another “selfie-hand” with colors
Shortly afterwards my daughter packed up her supplies/belongings for college and I was left to my own devices. I promptly ordered another set of markers similar to hers and am awaiting arrival…
I tried to use my “in-house” fine-tips to create more color tangles but they dried up after a few marks. I couldn’t wait for my ordered markers to arrive (Impatience IS my middle name) so I went to my local craft store and dropped $5 on a sale set of fine-tip markers that bled more than expected in my sketchbook but still turned out some fun results.
Bigger markers – same fun
Check out zentangle designs online y’all! It’s relaxing, fun and quick to spur new original designs. (I think these could make cool cards too! And rubber carving options – oh my!).
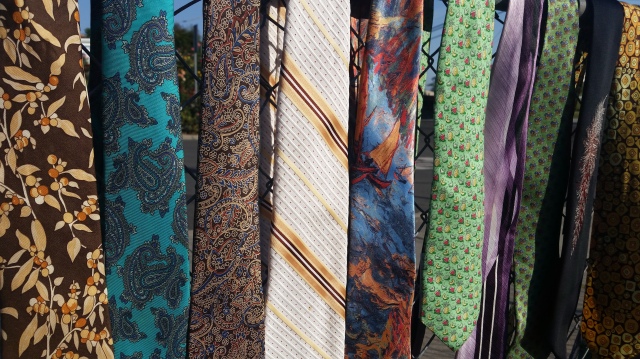
My mom sent me a great text recently: “I have access to lots of ties – want some for your crafts?” You betcha and yes ma’am!
So here’s some of the lovelies she picked out for me. What should I do with them?!
there’s art, upholstery, book covers…the possibilities are endless!crowns and a feather, we’re spanning some decades herethe white and tan beauty in the middle defies tie-dom with its texture and lack of definitive creases – I think maybe it’s aiming toward sash-dom…on a party dress…
The purple one to the right of center might be my favorite (after I sing “Sailing” by Christopher Cross and “Lime in the Coconut” in honor of pineapples everywhere…wait, there’s no pineapple involved in that song?! P.S. I don’t want to talk about watermelon right now…unless you can quote a song that mentions it).
These ties are pure gold and all my thanks go to my mom, who took the time to pick them out and mail them to me. I can’t imagine what I’ll make with these beauties…any ideas?
Hello All! I feel like I’ve been away forever, even though I’ve been sewing and crafting the whole time.
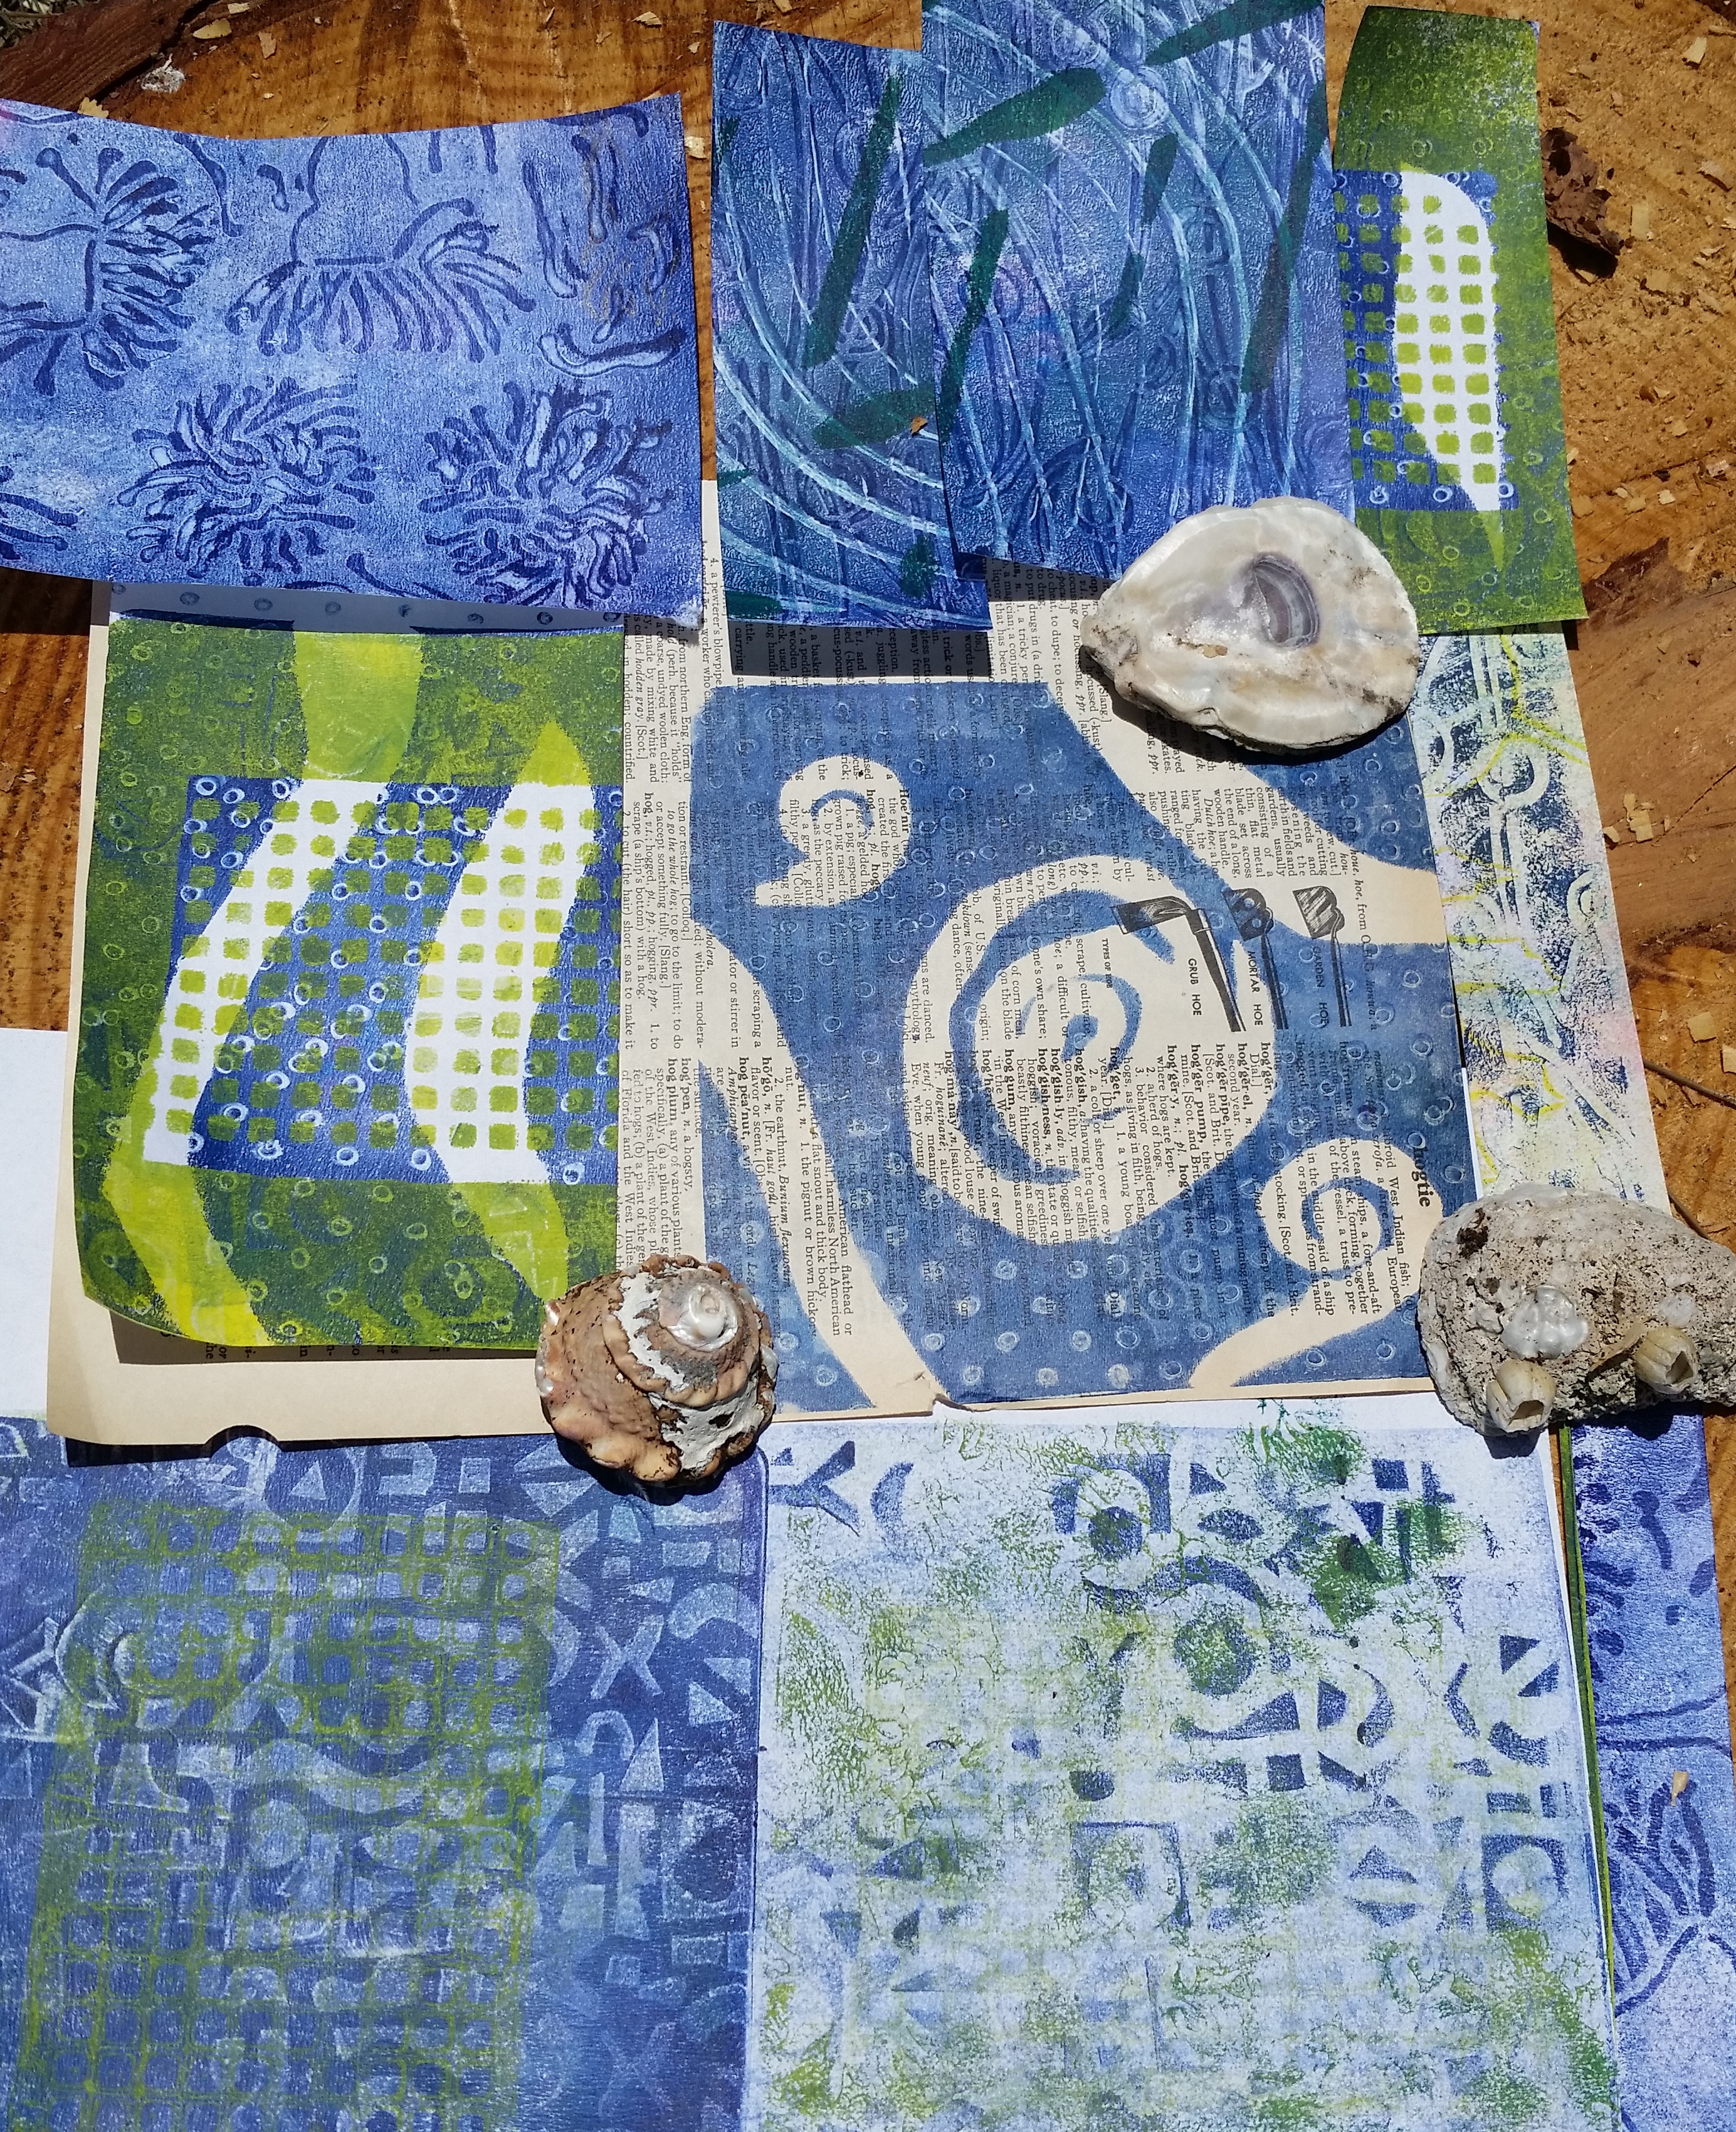
This week I took another class with Jane LaFazio, learning how to use a gelli art printing plate to create some fun monoprint “masterpieces.” In these classes I tend to forge ahead toward a finished product, then I love to step back and use the skills I’ve learned to create new things at home.
Print Once, Use in Multiple Projects
This is a layered technique, not only in the making but in the using. Collage and layering are fun challenges for me (it’s hard to cover up stuff I love and let the “next thing” emerge). First I used acrylic paint and a variety of resist material to create some fun patterns on rice paper. I gathered them in color palettes below.
Of course it was windy at photo time – the shell from the garden helped.These are both uncut because I’m just not seeing it…yet. P.S. The gals at the table next to me loved both of these images. So I’ma give it some time…
Color Palette #2
I was in too much of a hurry toward a finished product in class, so I wasn’t able until today to leisurely stroll through my prints and find my various color palettes. It was really fun to discover the color families I ended up making and I can’t wait to make some more (and work these into new projects).
I got an encyclopedia page in the mix, though the paint coverage isn’t very delineated (learning…). I think the upper right is my overall favorite – I like the mix of colors and shapes.
Wait, the bottom right is my new favorite. The red “roses” were made with rubber bands!
Color Palette #3
I added the seahorses afterwards from a rubber stamp I carved.
The purple and the swirls show up a little differently in this angle.
Color Palette #4
These are bolder than the rest – I like them!
In Process
I’m using a gel matte as glue to attach my favorite pieces to a 12 x 12 gesso board.
Ta-dah!
It needs a second layer of varnish but I’m digging it as a first effort!
Cover image from the 1940’s encyclopedias…ah the dreams…!
A few months ago I signed up for a site called nextdoor-dot-com (syntax to avoid spam) that has turned out to be a great app that keeps me posted on neighborhood happenings (I think it’s US-only in scope but surely there are others?) Subject matter ranges from lost dogs (I’ve posted in this category more than once, maybe because I live on a corner?) to police/criminal activity (good to know!) to free stuff (be still my heart!)…so an overall amazing channel to tune into as it relates to the streets around my house, right?!
This morning someone two streets over posted a note about “boxes of encyclopedias from 1947-49 with spine damage and some mold.” I think keywords “boxes” and “mold” might have scared off the average person, but this crafter was all alerts on the ready! Turns out it was just a few stacks of some vintage books I’ve been trying to manifest for about 2 years. Maps and everything y’all…and I’ve only seen a tiny suggestion of the possibility of moldish tendencies on one picture. a.k.a. A Gold Mine!! I’ll be stamping seahorses on these pages very soon…
Without Further Ado and For Your Viewing Pleasure (my two favorite introductions)
The spine and cover already intrigue me – they almost look like leather!
Random Pages
So I started opening books at random pages (before M. started frantically boxing them all up – I think he only got the “mold” alert and was a little worried…understandably).
The first page I opened: “Hostesses of the White House”Different book: We’re learning how to make arrowheads now…
I honestly didn’t try to find the CA map too hard (I still don’t know which parts of the alphabet I have in this book set – they went into boxes way too fast), but this opened up pretty quickly during my photo search and I latched onto the kismet.
This is part of a six-page spread on animals and plants you’ll find in the “Rain Forest.”
Zoiks right? I can’t wait to look through all these books in my non-copious free time in which I am preparing my future artistic career. Getting right on that…but really, what a fun find. I better become a Certified Organizer immediately to deal with my ever-growing craft supply (I just made that up, but I feel certain people are making money doing that today…DIY!!).
Today I went to Oceanside Museum of Art and took a class from Jane LaFazio to learn how to carve my own rubber stamp. It was a great class…but before we get to that…I got there an hour early…
And there was an art show in the streets!
So I got to browse around and found one of my favorite artists, Grace Swanson (GourdsByGrace.com). I bought a beautiful gourd from her last year that incorporated a dyed pine needle trim and woven antique silk kimono material. Today I found two new pieces I just HAD to have (I went back to her booth after class for a beaded gourd I had seen earlier, but got stars in my eyes over these two beauties and there was no going back).
She “chip carved” the outside of this gourd (involves a special tool that makes a notch or chip, then you scoop toward the notch). Then she dyed the notches.
She often scoops out her gourds (and sometimes appliques cool textures inside) but this one is left whole so the seeds inside shake around a little (I like that :).
Then there’s this piece of magic…
Grace carved the outside of this one then painted it (it’s a flat little gourd – belly button on the back :).
I love this oblong cut in the top (jagged on the carved/painted edge and smooth on the back edge).
Trying to capture some of the glitter of the paint
I was so glad to get the chance to see her work again and chat with her about her materials and process (she also does spectacular pine coiling and she uses Montezuma pine needles from Texas – we talked about the differences between those and the Torrey Pine needles in my neighborhood). Getting to add to my “Gourds by Grace” collection was icing on today’s cake.
And Now, Some Rubber Stamps
The class with Jane LaFazio was everything I hoped for and more. I spoke with someone who is taking one of her online courses as well and they come highly recommended. I got to see this gal’s art journal from the class (water colors and sketching) – so elegant and exactly the kind of skill I’d like to learn. I’m sure I’ll be signing up for the next one of those.
So we started with something called a “gum eraser” to get some practice and create something small.
I went with a wavy pattern. I’m in what I call my “water phase.” 😛
I borrowed the carving tools from the museum but I’m definitely going to invest in my own set because this is a fun and easy way to make amazing reusable patterns. In the class we talked about making Christmas cards, printing tote bags, combining these patterns with watercolor painting – the possibilities are endless. Some people made a printed envelope in class with some brown paper, and the teacher showed an example that she stamped, scanned and printed on vellum. So many options!!
My next design was a seahorse. I’m proud of the detail I was able to achieve in his body and fin (I worked thru the lunch break :). I’m planning to cut away more background so he isn’t framed with a rectangle.
So the bottom right design is my first print test after cutting out the seahorse (I kind of like the black background). Then I went through a series of trimming and printing to get at the effect I was after.
My stamp, next to some trial prints and a first drawing rev (the yellow-green paint represents where I’ll shave next to get rid of some of that “chatter”)
The teacher likes to work with black ink so she can watercolor the insides, but colored ink yields some cool results too…
What a fun day and an interesting class. The materials for this are not too expensive (cutting tool, some rubber pads and ink) and the results are really fun to play with (I haven’t even started to play with coloring in my designs with pencils and water colors). I saw some really artistic renderings today from folks who have some experiences with these stamps. We also learned ways to repeat patterns and create mosaic type designs. This might play a role in this year’s Christmas cards…
I love this especially because it is a lupine, which is closest to the Texas blue bonnet that I’ve found here. Missin’ my blue bonnets…Fuzzy on the creases – this one cracked me upHeart-shaped cactus – I didn’t notice until I processed the photos!Aren’t these amazing?! The color juxtaposition floors me…This flower just about undid me. So leggy – so other-worldly – with leaves to match…spiky green leavesBottle-brush bush in all its finery (not to be used to clean actual dirty dishes). 🙂Another feathery bloom like the white one above…Lacey…feathery…fluffy…flowery…loved these!!!Part of a hanging basket with many more blooms heading up to the front door. They look like Christmas Cactus blooms to me…Same house – hanging cactus in the background. I love the light/dark contrasts in this picI like the rocky backgrounds to these cactus flower shots.Colors and shadows…IN LOVE!
Looking forward to planting our new front/back yards with these native plants in mind.
This weekend the California Native Plant Society hosted an event in my neighborhood! I heard about it from the neighbors a few blocks over where I harvested the Torrey Pine needles I used recently for these mini-baskets. Their front and back yards were featured on the Native Plant tour this weekend (P.S. They’re also thrilled that someone wants all the pine needles they keep having to clean off their driveway. In fact, they had some “ready for me” that they must have picked up that morning to make things look tidy. They were happy to see me. 🙂 ).
So here’s some pictures (native and non-native plants are mixed in here – we viewed several hybrid gardens and I didn’t capture all the plant names). We got lots of great ideas and we ended the day in a small yard with chickens and a pair of Japanese quail (no actual pics – peaceful coop made out of a “Tuff Shed” – cute birds that I thought looked a little like hedgehogs, with those cream-colored feathers).
So Here’s Some Amazing So-Cal Flowers
A type of buckwheat (I like this one more than the many versions of white-flowering buckwheat bushes we saw).This is a tall-blooming poinsettia I’ve only seen down here in So-Cal, and how far inland you are determines how long they bloom (like the Coral Trees). I especially love this shot because I took it blind on my tip-toes (this flower was above my head).Native Iris – kind of unusual for such an arid climateAn acacia seed pod that nature opened for me. I turned it upside on my hand and shook out the seeds (usually these pods are sealed tight with four sides of really tough leathery leafy material that seems impossible to cut through). They make great rattles actually. (Amie – I’m already planning to go back and gather some for your nature-loving brood! Can’t believe I didn’t think of it in the moment…blaming it on the chickens and quail 🙂 )I loved capturing the flowers as well as the buds behind them that held more promise…the plant progression was palpable. (the wind was also blowing – which made photography fun)Cactus flowers are exquisite from start to finish. I love that these factor into xeriscaping. We have some lovely shares from neighbors in our garden already.A type of sage – I love how the flowers are as fuzzy as the leaves.There’s “Bottle-Brush” (trees) and “Fairy Duster” (bushes) versions of this flower. I think this this on the Fairy Duster end of the spectrum (growing close to the ground).
I have another list of photos I’ll post in v.2. We saw a lot of flowers/plants and got a lot of inspiration. We’re ready for water barrels and native plants, with some planning.
I bought some more boxes, and now I’m wondering where all these amazing cigar boxes are going?! The cigar store owners seem to be very ready to get rid of them…like maybe it’s a problem related to selling cigars!
They’re all so different!
I happened upon a new store recently and thought to ask about empty boxes. At first he said he sells them for $1.99 each, and that a man comes by every two months or so and buys them all – and he offers them to him for one dollar each at that time. I asked him what the man uses them for, but he hasn’t asked (ah well).
So then he offered me 11 boxes for $10. How can one resist? I mean, they’re so weird and different – every one! Some of them even have a little clasp to close them, like on my diary from a million years ago (e.g. childhood)!
So now I own “A LOT” of cigar boxes – some of which are being used for craft supplies (not labeled yet, so it’s a hunt-and-chase situation…mergh…:\ )
They come in all shapes and sizes (what crafter isn’t “wow’ed” by that alone?!). The one on the left is a trapezoid (I think…whatever, it’s a weird shape!)
It has a magic slide top y’all. Seriously. Are cigar smokers doing magic now and we just didn’t realize it?
This box has a wooden partition in it that has a label glued on the edge…which says “Hand Made.”
So much wow.
I think I’m officially addicted now to cigar boxes. (According to all the labels, I’m better off addicted to the boxes than the cigars…have to figure out how to remove all those useful labels…P.S. DON’T SMOKE…but check out smoke shops because they probably have some cool boxes sitting around that they want to get rid off).
I’m busily sewing up this Alabama Chanin Stitch Corset featured (in pieces) in this post: Hand Stitching a Garment. I’ve since embellished it with beads and I’m putting in seams on all the pieces. There’s more before the end…pics to come.
Meanwhile, here’s some beautiful patterns I saw during our recent San Diego Arboretum visit.
a hollowed out logThese brown strands were not on the underside of every leaf…I was so enraptured I forgot to read the sign telling me what this enchanting plant’s name is…
Lots of looking up for these pictures, and it was so worth it!