Stamping Christmas Cards (sorry it’s so early)

I’m happy to report that I’m working way ahead of schedule this year in the area of Christmas cards. Year before last I stitched some Christmas card beauties and, frankly, set the bar way too high for myself, as witnessed by last year when I barely wrote replies to those industrious souls who kept us on their list. It’s a tough grind that one wants to keep going right? (Yes we do – it’s worth it – handwritten snail mail rocks!). In some cases it’s our only reachout to some of our favorite people! And once my progeny moved out of the house the ready-made family photo was no longer available as card material, so I had to come up with something (dog photos? Scruffy is pretty Scruffy-licious!)

Draw a Few/Carve Once – Stamp Lots

One of the things I love about rubber stamp carving is that it allows me to easily share a creative idea across multiple media. I’ve just experimented with paper here but I can see some fun to be had in stamping material with these (handmade stamped canvas gift bags?).

20160718_184842
I sketched so many trees before I figured this one out! I like the way it comes out after Sharpie embellishments.
20160718_184349
So many things to love…

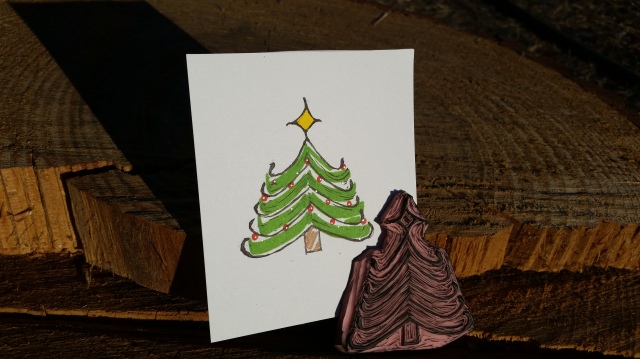
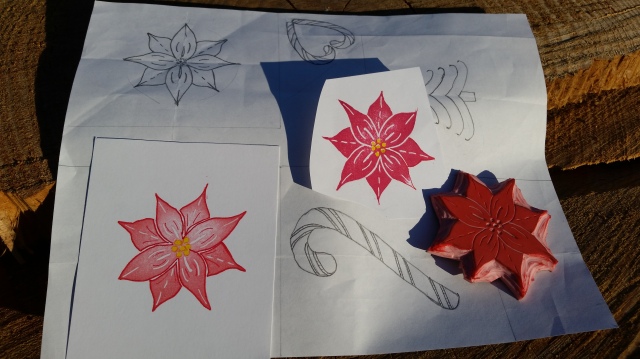
The drawing for the tree stamp is partially showing top right, so that’s fun to see in it’s original state (the candy cane and heart you’ll see in a minute). Then the poinsettia, which I stamped in a darker red to accentuate the spaces, and also in a lighter red so I could marker-outline the edges. Right now I can’t decide which I like more. Let’s make 10 of each!

I think those are the winners in this year’s contest for “Which Rubber Stamp Carvings Will Make This Year’s Christmas Cards” (the acronym isn’t worth it…this contest may never happen again).

Runners Up

Candy canes big and small deserve air time, and I’m here to make sure that happens.

20160718_184801
The heart candy canes are my own design (though I doubt I’m the first to think of it so I won’t be seeking a patent) and I think they’ll look great on the sealed back of a Christmas/Valentine’s Day card envelope.

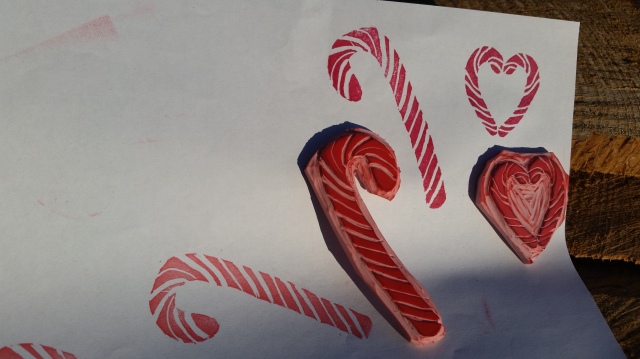
The larger candy cane stands alone as a tribute to lazy rubber stamp carving. It was easy, so I did it, and I can’t imagine where I’ll use it. Such is the way with rubber stamp carving sometimes. (Good news: I used a scrap piece from another stamp to make it, so no full rubber stamp lives were lost in the making of this candy cane stamp.) Phew! Thank you for your concern.

Sending love and thoughts of light. What art are you working on today?


Bringing It All Together: I’m Making Cards!

I had to wait awhile to post pictures of this so my daughter wouldn’t see her birthday card ahead of time. I’m having a lot of fun using my mono prints and stamps to make impromptu cards (anyone else out there boycotting purchased greeting cards and all they stand for? UNITE!).

So here’s what I made to celebrate my daughter’s offspringing…

638cover
I added beads to the embroidery then used double-sided tape to attach it to a piece of scrapbooking paper.
20160614_174855
Then I glued a mono-printed page to the inside top and stitched my needle lace to the bottom (I like how the cut threads added to the wave motion).
20160527_150704
close-up of the mono print
20160614_174845
close-up of the attached needle lace
20160527_150720
Back of the card – I like how the blue silk stitches seem to interact with the gold grassy marks.

I really enjoyed adding beads to my embroidered patterns and I suspect that technique might make another appearance. I especially enjoyed finding a use for my needle lace pattern AND avoiding the greeting card industry. It’s evil y’all. Buy card stock on sale and draw a picture. Your loved ones will love it even more than that $7 card that sings.

P.S. I used my mono prints recently to create a thank you card (plus two bonus bookmarks I included…that could be used to create two new cards…). It’s the gift that keeps on giving, as well as a gift that’s fun to give. I highly recommend purchasing a cheap gelli-plate and going to town. It’s kind of a “no wrong answers” situation: even your least favorite print can be turned into your favorite bookmark.

Embroidering My Stamps on Cloth

I’ve been having a lot of fun carving my own stamps since my class with Jane LaFazio. I decided to make a stamp from the wave pattern I used for my last needle lace design. I’m thrilled with the results.

The carved stamp is on top of the needle lace pattern it came from. Ink stamps and needle lace results surround.
The carved stamp is on top of the needle lace pattern it came from (you can see the needle holes if you look closely). Ink stamps and needle lace results surround.

I’m digging the rubber stamp carved “chatter” inside the waves – I tried to let this flow while I was carving instead of doing a full excavation. (There were so many unintended puns in there that my fingers got sparked off the keyboard for a second. Unintended y’all, I promise.)

Close-up on the wave needle lace. I love the shadows at the top of the waves. I was really going for motion with the different thread choices.
Close-up on the wave needle lace. I love the shadows at the top of the waves. They add to the motion of the ocean (couldn’t resist – I’ll try to stop).

I especially like seeing the end products next to the pattern. So different when it’s transferred to ink on page vs. needle laced. If you’re digging that, wait til you see what’s next!

This is my first embroidered stamped pattern...I learned a lot.
This is my first embroidered stamped pattern…I learned a lot.
close-up on the shiny thread...and spooky eye
close-up on the shiny thread…and spooky eye

So I really like metallic and silk thread…and they’re very finicky. I think Seahorse Dude is kind of gnarly as a result, which makes sense when you think about his time underwater in the ocean…moving on…

WIP
WIP – loving the direction of the daisy chain stitches
Finished product - yay metallic thread!
Finished product – yay metallic thread!
Turtle gets a close-up...he's on the move!
Turtle gets a close-up…he’s on the move!

Earlier today…I was getting a smog-check on my car next to a craft store…so I spent my time wisely.

Super cool frame idea (way too much $$ for purchase...even with a coupon)
Super cool frame idea (way too much $$ for purchase…even with a coupon)
And a close-up on our favorite wave (pre-embroidery!)
And a close-up on our favorite wave (pre-embroidery and in a borrowed frame!)

It’s fun to see my rubber stamp patterns come to life in stitching!

Crafting/Sailing Away…

Carving Rubber Stamps (and I bought some amazing gourds!)

Today I went to Oceanside Museum of Art and took a class from Jane LaFazio to learn how to carve my own rubber stamp. It was a great class…but before we get to that…I got there an hour early…

And there was an art show in the streets!

So I got to browse around and found one of my favorite artists, Grace Swanson (GourdsByGrace.com). I bought a beautiful gourd from her last year that incorporated a dyed pine needle trim and woven antique silk kimono material. Today I found two new pieces I just HAD to have (I went back to her booth after class for a beaded gourd I had seen earlier, but got stars in my eyes over these two beauties and there was no going back).

She "chip carved" the outside of this gourd (involves a special tool that makes a notch or chip, then you scoop toward the notch). Then she dyed the notches.
She “chip carved” the outside of this gourd (involves a special tool that makes a notch or chip, then you scoop toward the notch). Then she dyed the notches.

She often scoops out her gourds (and sometimes appliques cool textures inside) but this one is left whole so the seeds inside shake around a little (I like that :).

Then there’s this piece of magic…

Grace carved the outside of this one then painted it (it's a flat little gourd - belly button on the back :).
Grace carved the outside of this one then painted it (it’s a flat little gourd – belly button on the back :).


I love this oblong cut in the top (jagged on the painted edge and smooth on the back edge).
I love this oblong cut in the top (jagged on the carved/painted edge and smooth on the back edge).


Trying to capture some of the glitter of the paint

I was so glad to get the chance to see her work again and chat with her about her materials and process (she also does spectacular pine coiling and she uses Montezuma pine needles from Texas – we talked about the differences between those and the Torrey Pine needles in my neighborhood). Getting to add to my “Gourds by Grace” collection was icing on today’s cake.

And Now, Some Rubber Stamps

The class with Jane LaFazio was everything I hoped for and more. I spoke with someone who is taking one of her online courses as well and they come highly recommended. I got to see this gal’s art journal from the class (water colors and sketching) – so elegant and exactly the kind of skill I’d like to learn. I’m sure I’ll be signing up for the next one of those.

So we started with something called a “gum eraser” to get some practice and create something small.

I went with a wavy pattern. I call this my "water phase." :P
I went with a wavy pattern. I’m in what I call my “water phase.” 😛

I borrowed the carving tools from the museum but I’m definitely going to invest in my own set because this is a fun and easy way to make amazing reusable patterns. In the class we talked about making Christmas cards, printing tote bags, combining these patterns with watercolor painting – the possibilities are endless. Some people made a printed envelope in class with some brown paper, and the teacher showed an example that she stamped, scanned and printed on vellum. So many options!!

tbd
My next design was a seahorse. I’m proud of the detail I was able to achieve in his body and fin (I worked thru the lunch break :). I’m planning to cut away more background so he isn’t framed with a rectangle.

So the bottom right design is my first print test after cutting out the seahorse (I kind of like the black background). Then I went through a series of trimming and printing to get at the effect I was after.

My stamp, next to some trial prints and a first drawing rev
My stamp, next to some trial prints and a first drawing rev (the yellow-green paint represents where I’ll shave next to get rid of some of that “chatter”)


The teacher likes to work with black ink so she can watercolor the insides, but colored ink yields some cool results too...
The teacher likes to work with black ink so she can watercolor the insides, but colored ink yields some cool results too…

What a fun day and an interesting class. The materials for this are not too expensive (cutting tool, some rubber pads and ink) and the results are really fun to play with (I haven’t even started to play with coloring in my designs with pencils and water colors). I saw some really artistic renderings today from folks who have some experiences with these stamps. We also learned ways to repeat patterns and create mosaic type designs. This might play a role in this year’s Christmas cards…